ViewController간 이동할 때 화려한 애니메이션을 접한적이 있지않나요??
이러한 애니메이션을 주면 앱이 이뻐보이기도 하구요..!
그래서 해보려고 도전했어요
먼저 쓰이는 함수를 알아볼게요
UIViewControllerAnimatedTransitioning(Protocol)

view controller를 전환할 때 커스텀으로 애니메이션을 주고싶다면 이것을 구현하래요
UIPercentDrivenInteractiveTransition(Class)

한 컨트롤러와 다른 컨트롤러 간에 상호작용 애니메이션을 구동할 수 있게해주는 역할인것같아요
UIViewControllerTransitioningDelegate(Protocol)

뷰 컨트롤러 간의 전환을 관리하는 데 사용되는 Delegate같아요
이렇게만 보면 잘모르겠어요....
암튼 커스텀 애니메이션을 만들때 이 3가지 함수는 필수요소로 보이네요!!
최종 목표는 앱스토어 애니메이션처럼
누르면 확대되는 동작을 해보려고 해요..
완벽하진않지만 비슷하게나마...
애니메이션동작을 정의할 클래스는 아래와 같아요
class AnimationTransition: UIPercentDrivenInteractiveTransition, UIViewControllerAnimatedTransitioning {
  	// 애니메이션 동작시간
    func transitionDuration(using transitionContext: UIViewControllerContextTransitioning?) -> TimeInterval {

    }
    // 애니메이션 효과정의
    func animateTransition(using transitionContext: UIViewControllerContextTransitioning) {

    }
}
여기에 원하는 동작을 정의하고
UIViewControllerTransitioningDelegate
에
적용시켜줄거에요
extension FirstViewController: UIViewControllerTransitioningDelegate, UINavigationControllerDelegate {
    // present될때 실행애니메이션
    func animationController(forPresented presented: UIViewController, presenting: UIViewController, source: UIViewController) -> UIViewControllerAnimatedTransitioning? {
        return transition
    }
    // dismiss될때 실행애니메이션
    func animationController(forDismissed dismissed: UIViewController) -> UIViewControllerAnimatedTransitioning? {
        return DisMissAnim()
    }

    func interactionControllerForPresentation(using animator: UIViewControllerAnimatedTransitioning) -> UIViewControllerInteractiveTransitioning? {
        // Presenting usually doesn't have any interactivity
        return nil
    }
    func interactionControllerForDismissal(using animator: UIViewControllerAnimatedTransitioning) -> UIViewControllerInteractiveTransitioning? {
        return nil
    }

    // UINavigationControllerDelegate push/pop 애니메이션
    func navigationController(_ navigationController: UINavigationController, animationControllerFor operation: UINavigationController.Operation, from fromVC: UIViewController, to toVC: UIViewController) -> UIViewControllerAnimatedTransitioning? {
        return nil
    }
}
animationController(forPresented presented...)
animationController(forDismissed dismissed...)
interactionControllerForPresentation
interactionControllerForDismissal
navigationControlle(..., from fromVC: UIViewController, to toVC: ...)
UIViewControllerTransitioningDelegate에는 4개의 함수가
UINavigationControllerDelegate 에는 1개의 함수가있어요
present될때 실행할 애니메이션 UIViewControllerAnimatedTransitioning 객체를 넣어주면되요
dismiss 도 마찬가지
interactionControllerForPresentation
이 함수는 나타나거나 사라지고 있을때 도중의 작업을 정의하는것 같아요
드래그로 화면을 끌어서 끄는 화면이있다면 도중에 끄고있을때 생기는 애니메이션을
정의하는 거라고 추측하고 있어요
(추후에 더 공부하고 해보려합니다...!)
이제 애니메이션을 만들어볼까요?!
func animateTransition(using transitionContext: UIViewControllerContextTransitioning) {
	let containerView = transitionContext.containerView
	// 다음 보여질뷰 참조
	guard let toView = transitionContext.view(forKey: .to) else {
		return
	}
	containerView.addSubview(toView)
}
transitionContext.containerView - 뷰를 담을 수 있는 전체 틀이라고 생각하면되요!
transitionContext.view를 통해서 보여지거나, 사라질 뷰를 가져올거에요
키값에는 .from, .to 이 잇어요
from - (~로부터) 앞으로 가려질뷰, 사라질 뷰를 가르켜요
to - (~으로) 앞으로 보여질뷰, 나타날 뷰를 가르켜요
저 같은경우는
첫번째화면에서(From)
두번째화면으로(To)
Present할거고
그 뷰에 애니메이션을 적용할거니까
To를 참조해야겟죠?
틀에 다음뷰를 addSubView를통해서 넣어주면 이제 화면이 나타나죠
여기서부터
다음뷰의 위치, 크기등을 정의해서 애니메이션을 만들어야해요
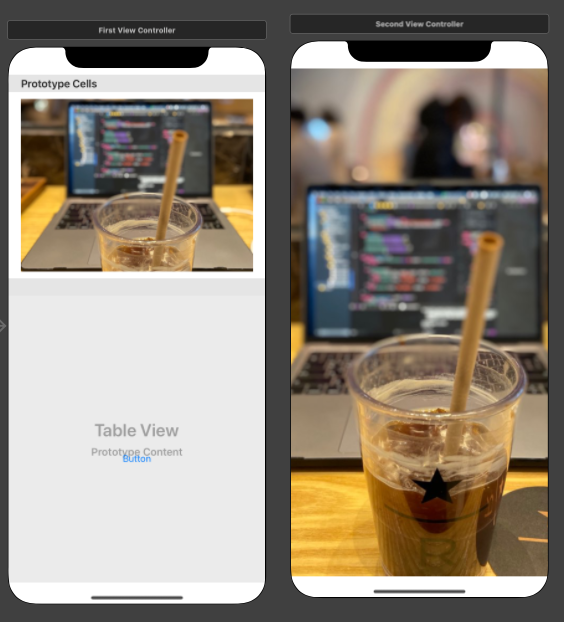
왼쪽화면(테이블셀) 을 클릭하면
셀을 기준으로 오른쪽 화면이 커지게 나타날거에요
간단한 테이블뷰를 만들고...
extension FirstViewController: UITableViewDelegate, UITableViewDataSource {
    func tableView(_ tableView: UITableView, numberOfRowsInSection section: Int) -> Int {
        return 2
    }

    func tableView(_ tableView: UITableView, cellForRowAt indexPath: IndexPath) -> UITableViewCell {
        let cell = tableView.dequeueReusableCell(withIdentifier: "testCell", for: indexPath)
        return cell
    }

    func tableView(_ tableView: UITableView, didSelectRowAt indexPath: IndexPath) {
        guard let cell = tableView.cellForRow(at: indexPath) else {
            return
        }
        // 좌표계 전환 nil일시 윈도우좌표계
        cellOriginPoint =  cell.superview?.convert(cell.center, to: nil)
        cellOriginFrame =  cell.superview?.convert(cell.frame, to: nil)
        transition = AnimationTransition()
        transition?.setPoint(point: cellOriginPoint)
        transition?.setFrame(frame: cellOriginFrame)
    }
}
cell을 클릭하면 frame을 애니메이션 객체에 넘겨줄거구요
class AnimationTransition: UIPercentDrivenInteractiveTransition, UIViewControllerAnimatedTransitioning {
    var originPoint: CGPoint?
    var originFrame: CGRect?

    func setPoint(point: CGPoint?) {
        self.originPoint = point
    }

    func setFrame(frame: CGRect?) {
        self.originFrame = frame
    }

    func transitionDuration(using transitionContext: UIViewControllerContextTransitioning?) -> TimeInterval {
        return 1
    }
    // animation될 뷰지정
    func animateTransition(using transitionContext: UIViewControllerContextTransitioning) {
        let containerView = transitionContext.containerView
        // 다음 보여질뷰 참조
        guard let toView = transitionContext.view(forKey: .to) else {
            return
        }
        // 보여질뷰의 위치잡기 (Cell의 frame)
        toView.frame = originFrame!

        // MARK: CGAffineTransform을 이용한 효과
        toView.transform = CGAffineTransform(scaleX: 0.8, y: 0.8)

        containerView.addSubview(toView)
        // hierarchy on top
        containerView.bringSubviewToFront(toView)

        toView.layer.masksToBounds = true
        toView.layer.cornerRadius = 20
        toView.alpha = 0
        // MARK: 애니메이션 적용
        UIView.animate(withDuration: 0.5, delay: 0, usingSpringWithDamping: 0.6, initialSpringVelocity: 0.5, options: .curveEaseOut, animations: {


        // MARK: 원래자리로 되돌리면서 애니메이션 이동효과
        toView.transform = .identity
        toView.alpha = 1

        }) { _ in
            toView.translatesAutoresizingMaskIntoConstraints = false
            toView.topAnchor.constraint(equalTo: containerView.topAnchor).isActive = true
            toView.bottomAnchor.constraint(equalTo: containerView.bottomAnchor).isActive = true
            toView.leadingAnchor.constraint(equalTo: containerView.leadingAnchor).isActive = true
            toView.trailingAnchor.constraint(equalTo: containerView.trailingAnchor).isActive = true

            UIView.animate(withDuration: 1) {
                containerView.layoutIfNeeded()
            }
        }

        transitionContext.completeTransition(true)
    }
}
위의 코드는
초기 뷰의상태가
0.8배로 축소, 알파값 0 에서
1배로오면서 알파값 1을 줌으로써
살짝 커지는 효과를 주고
애니메이션후 오토레이아웃을 잡아줌으로써
화면에 꽉차게 커지도록 구현한 코드에요
이렇게 만든 애니메이션 객체를
extension FirstViewController: UIViewControllerTransitioningDelegate, UINavigationControllerDelegate {
    // present될때 실행애니메이션
    func animationController(forPresented presented: UIViewController, presenting: UIViewController, source: UIViewController) -> UIViewControllerAnimatedTransitioning? {
        return transition
    }
    // dismiss될때 실행애니메이션
    func animationController(forDismissed dismissed: UIViewController) -> UIViewControllerAnimatedTransitioning? {
        return DisMissAnim()
    }
}
첫번째 뷰컨트롤러에 프로토콜을 채택하고
설정해줍시다!!
여기서 DisMissAnim는
마찬가지로 사라지는 애니메이션 객체를 간단하게 만들었어요
class DisMissAnim: UIPercentDrivenInteractiveTransition, UIViewControllerAnimatedTransitioning{
    func transitionDuration(using transitionContext: UIViewControllerContextTransitioning?) -> TimeInterval {
        return 0.5
    }

    func animateTransition(using transitionContext: UIViewControllerContextTransitioning) {
        // 사라지는 뷰(종료되는 뷰)
        guard let fromView = transitionContext.view(forKey: .from) else {
            return
        }
        UIView.animate(withDuration: 0.2, animations: {
            fromView.alpha = 0
        }) { (completed) in
            transitionContext.completeTransition(completed)
        }
    }
}
dismiss되면
두번째화면에서 (From)
첫번째화면으로 (To)
오니까
From을 참조해서 두번째화면이 꺼지니까
알파값을 0을 주면서 사라지도록 했어요
    @IBAction func buttonClick(_ sender: Any) {
        guard let secondVC = self.storyboard?.instantiateViewController(withIdentifier: "SecondVC") as? SecondViewController else {
            return
        }
        secondVC.transitioningDelegate = self
        secondVC.modalPresentationStyle = .custom
        present(secondVC, animated: true)
    }
그리고 하나더 중요한것은
(두번째화면)다음화면에도 transitioningDelegate를 설정해줘야해요
modalPresentationStyle은 custom으로 해주시구요!!
자 이제 끝났어요 어떻게 작동하나 볼까요???
동작 방식을 이해하는데 좀 헷갈렸었고
감을 잡는데 좀걸린거 같아요
그래도 하고나니까 이뻐보이네요 ㅎㅎ
이 맛에 애니메이션 하는가봐요
'iyOmSd > Title: Swift' 카테고리의 다른 글
| [Swift] - Simple Carousel Effect CollectionView With Animation (0) | 2020.05.08 |
|---|---|
| [Swift] - TabBar 애니메이션: CollectionView를 이용한 페이징 (2) | 2020.04.29 |
| [Swift] - Apple Login (2/2) (0) | 2020.04.14 |
| [Swift] - Apple Login (1/2) (0) | 2020.04.14 |
| [Swift] - MultiPart통신 (멀티파트 이미지업로드) (2) | 2020.04.11 |