NSTextAttachment 요타입에 대해 알아보려합니다~!
???: 보기 드문타입인거같은데 어떻게 이 타입을 알게 됐나요..?
🤯: 요구사항을 보고 이건 클릭이 안 되겠지 생각하고 간략히 속성을 보여주는 뷰구나~ 하고 Label 컴포넌트로 만들어놨는데...
추후에 특정타입만 클릭이 가능하고.. 특정 타입에 대해선 이미지까지 앞에 붙어야하는 스펙이더라구요...
이걸 버튼으로 바꿔야하나.. 말아야하나...이미 구현해놔서 건드려야하는게 많아서
Label에 이미지를 넣을 순 없을까 하던중 찾게 된 타입이죠
정의!
attributed strings and related objects의 첨부 특성값이라네요
정의만 보고는 먼 소린지 모르겠네요!
NSTextAttachment는 NSAttributedString에서 쓰이고
NSAttributedString는 NSMutableAttributedString에서 쓰이네요!
제일 상단에서부터 내려와볼까요
NSMutableAttributedString
NSAttributedString의 특정범위에 스타일을 설정 할 수 있는 타입
text + range로 특정 범위만 텍스트의 스타일을 지정할 수 있습니다
이타입에 NSAttributedString를 append하여 사용할 수 있어요

NSAttributedString
string에 관련된 속성(시각적, 하이퍼링크, 접근성 데이터)가 있는 문자열
NSAttributedString.Key를 이용하여 폰트, 문단, 색, 밑줄 등 커스텀가능하죠
NSAttributedString에는 아래와같이 attatchment로 생성자가 정의돼있어요

NSTextAttachment

위의 사진처럼
image가 프로퍼티로 존재하죠
이 image 넣어서 생성할 수 있도록 생성자로 구현도 돼있구요

따라서 image → NSTextAttachment → NSAttributedString → NSMutableAttributedString을 통해 텍스트에 이미지를 넣을 수 있게 돼요
그럼 간단하게 이미지를 text화 시켜볼까요?!
final class AttributeTextTest: UIViewController {
    override func viewDidLoad() {
        super.viewDidLoad()
        makeLabel()
    }

    func makeLabel() {
        let label = UILabel()
        let word = "하이"
        let leadingIcon = UIImage.add

        let attributeString = NSMutableAttributedString(string: "")
        let imageAttachment = NSTextAttachment(image: leadingIcon)
        imageAttachment.bounds = .init(x: 0, y: -1, width: 14, height: 14)
        attributeString.append(NSAttributedString(attachment: imageAttachment))
        attributeString.append(NSAttributedString(string: word))

        label.attributedText = attributeString
        label.textAlignment = .center
        label.frame = .init(x: 100, y: 100, width: 100, height: 30)
        view.addSubview(label)
    }
}
간결한 코드에요

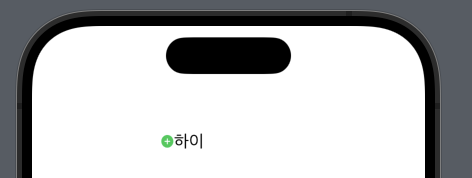
이런 Label이 보여지죠
attachment의 bound로 이미지의 위치와 크기를 조절해야 이쁘게 잘 나오구요
attributeString에 append하는 순서에따라 이미지가 앞에, 뒤에 가도록 설정 할 수 있어요
여기서 궁금한점!
label.text을 한다면 어떻게 print될까?
print("⏩️label text:", label.text!)
딱 글자만나오네요
라고 생각했죠?
아닙니다...!
"하이" 앞에 빈칸이 좀있는게 보이시나여?!
저건 빈칸으로보이지만 빈칸이 아닌 이미지의 자리입니다
print("⏩️attributeString:", attributeString)
그래서 == 연산을 하면 다르다고 나오고 count를 하면 3이라고 나와요
print("⏩️빈칸비교", label.text! == "하이")
print("⏩️빈칸비교", label.text! == " 하이")
print("⏩️text count", label.text!.count)
따라서 label의 text값을 이용하려고 할때 주의가 필요해요
이미지가 앞에있다면 hasSuffix를 이용해서 뒤에있는 문자열만 비교한다던가
dropFirst를 통해서 앞에 이미지자리를 날려버리고 오로지 문자열만 비교한다던가
좀돌고돌고 복잡한 방법이지만 text의 attributes에 접근해서 image객체에 접근한다던가 해서
필요한 연산을 처리할 수 있어요
// 텍스트 출력 비교
print("⏩️label.text:", label.text!)
print("⏩️label.attributedText.string:", label.attributedText!.string)
// text와 attributeString 비교
print("⏩️text == attribute string:", label.text == label.attributedText?.string)
print("⏩️word == attribute string:", "\(imageAttachment)\(word)" == label.text!)
// 값 비교
var labelText = label.text!
print("⏩️hasPrefix(word):", labelText.hasPrefix(word))
print("⏩️hasSuffix(word):", labelText.hasSuffix(word))
let imageDropText = labelText.dropFirst()
print("⏩️imageDropText dropFirst == word", imageDropText == word)
labelText.removeFirst()
print("⏩️imageDropText removeFirst == word", labelText == word)
dropFirst()하면 딱 텍스트만 비교할 수 있어요
removeFirst()도 마찬가지예요
// image찾기
let leadingIcon = UIImage.add
let imageAttachment = NSTextAttachment(image: leadingIcon)
...

var range = NSRange()
let attributeDic = label.attributedText!.attributes(at: 0, effectiveRange: &range)
print("⏩️attribute image", attributeDic[.attachment] as? NSObject === imageAttachment)
'iyOmSd > Title: Swift' 카테고리의 다른 글
| [Swift] iMessage 필터링 ILMessageFilterExtension (스팸 차단) (2) | 2024.02.27 |
|---|---|
| [Swift] TimeZone과 Locale (1) | 2024.01.30 |
| [Swift] Multi Line Tag View 그리기 (3) | 2023.09.30 |
| [Swift] Core Motion (feat. 흔들기 감지센서 개발) (0) | 2023.04.19 |
| [Swift] Pulse 네트워크 디버깅 라이브러리 (0) | 2023.03.29 |