한번 만들어봐야지 생각만하고 해보지못했던 위젯을 드디어 만들어 보려고합니다~~
평소에 iOS프로젝트 생성하듯이 빈프로젝트를 만들고

Target을 선택하면
~~Extension이 많이보여요
그중에서 이번에 할 것은 위젯이니까

찾아서 클릭!
위젯이름 넣어주고
만들면
Active하겠냐고 묻는거 확인누르고!
이제 위젯이 만들어졌어요!
빌드하면 제가 방금만든 위젯이 보일거에요

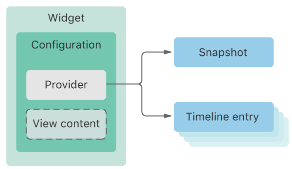
위젯에는 3가지 요소가 중요해요
WidgetConfiguration: 위젯 식별 및 위젯의 Content표시
Provider: 시간에 따른 위젯 업데이트 로직
EntryView: 위젯을 표시하는 View
처음으로 구현되어있는 코드를보면
Widget코드!
@main
struct NSWidget: Widget {
    let kind: String = "NSWidget"

    var body: some WidgetConfiguration {
        IntentConfiguration(kind: kind, intent: ConfigurationIntent.self, provider: Provider()) { entry in
            NSWidgetEntryView(entry: entry)
        }
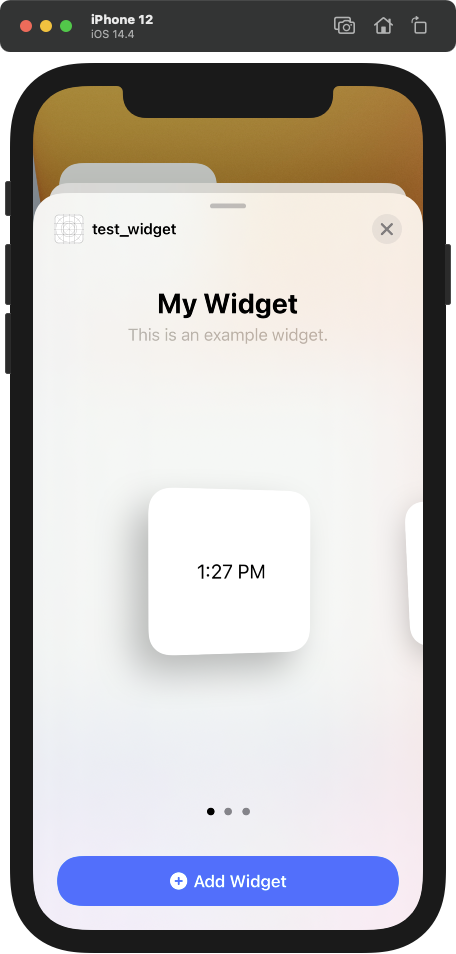
        .configurationDisplayName("My Widget") // 위젯 설명 타이틀
        .description("This is an example widget.") // 위젯 설명 부타이틀
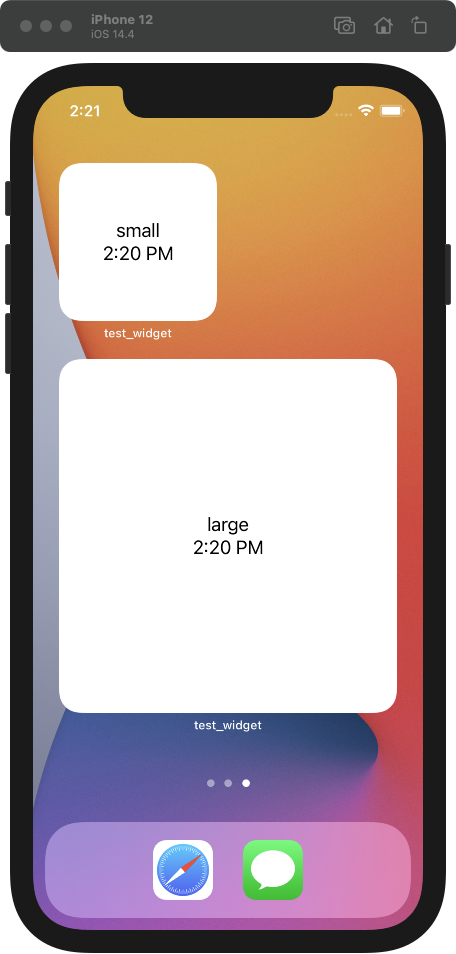
        .supportedFamilies([.systemSmall, .systemLarge]) // 위젯 크기 설정
    }
}
위젯의 타이틀과 부타이틀의 내용이 저기에 들어간다는걸 볼수 있어요
IntentConfiguration
사용자가 구성할 수 있는 속성이 있는 위젯
위젯에서 Edit를 통해서 위젯에 보여질 내용을 변경할 수 있음
StaticConfiguration
사용자가 구성할 수 있는 속성이 없는 위젯
정적인 데이터를 보여주기에 알맞은 타입의 위젯이에요
예) 일반적으로 주식시장 위젯이나 뉴스 헤드라인을 보여주는 위젯
생성자의 매개변수들을 하나씩 볼게요
kind: 위젯의 identifier
provider: 렌더링할 시기를 WidgetKit에 알려주는 타임라인을 생성함
클로져: SwiftUI 뷰를 포함. WidgetKit는 이를 호출하여 내용을 렌더링하고 provider로 부터 타임라인 엔트리 파라미터를 전달함
intent: 사용자가 구성할 수 있는 속성을 정의
다음으로 Provider을 알아볼게요
struct Provider: IntentTimelineProvider {
    func placeholder(in context: Context) -> SimpleEntry {
        SimpleEntry(date: Date(), configuration: ConfigurationIntent())
    }

	// 위젯 갤러리에서 보여질 부분
    func getSnapshot(for configuration: ConfigurationIntent, in context: Context, completion: @escaping (SimpleEntry) -> ()) {
        let entry = SimpleEntry(date: Date(), configuration: configuration)
        completion(entry)
    }
	// 정의한 타임라인에 맞게 업데이트해서 보여질 내용
    func getTimeline(for configuration: ConfigurationIntent, in context: Context, completion: @escaping (Timeline<Entry>) -> ()) {
        var entries: [SimpleEntry] = []

        // Generate a timeline consisting of five entries an hour apart, starting from the current date.
        let currentDate = Date()
        for hourOffset in 0 ..< 5 {
            let entryDate = Calendar.current.date(byAdding: .hour, value: hourOffset, to: currentDate)!
            let entry = SimpleEntry(date: entryDate, configuration: configuration)
            entries.append(entry)
        }

        let timeline = Timeline(entries: entries, policy: .atEnd)
        completion(timeline)
    }
}placeholder: 특정 내용이 없는 시각적표현
getSnapshot: WidgetKit이 위젯이 일시적인 상황에 나타나면 호출하는 함수
Context.isPreivew가 참이면 위젯 갤러리에 위젯이 나타남
이경우 가능한 빨리 처리하기위해 위젯의 현재상태를 가져오거나 몇초이상 걸릴 수 있는경우 샘플 데이터를 제공함
위젯갤러리에서 위젯을 고를 때 보이는 샘플있죠? 그때 보이는 작업을 여기에 해주면되요
getTimeline: 현재 시간과 위젯을 업데이트할 향후 시간에 대한 타임라인 항목을 제공함
Timeline타입의 매개변수로 policy라는게있는데
TimelineReloadPolicy타입이구요
이 타입이 위젯에 새로운 타임라인을 제공해주는 시기를 지정할 수 있도록해줘요
.atEnd - 현재주어진 타임라인이 마지막일 때 새로 타임라인을 요청
.after - 해당 date후에 새로운 타임라인 요청
.never - 가능한 즉시 새로운 타임라인을 요청..?(A policy that specifies that the app prompts WidgetKit when a new timeline is available.)
위젯의 크기가 다양하게 있는걸 아시나요?!
@Environment(\.widgetFamily) var family: WidgetFamily이코드를 통해서 위젯의 환경변수에 접근해서 작은위젯 중간위젯 큰위젯에 접근 할 수 있어요
또한 Entry타입에도 Context정보가 포함되어있어서 골라서 사용하면되요
마지막으로 위젯을 나타낼 뷰의 코드인 EntryView!
struct NSWidgetEntryView : View {
    @Environment(\.widgetFamily) var family: WidgetFamily
    var entry: Provider.Entry

    var body: some View {
        sizeBody()
    }

    @ViewBuilder
    func sizeBody() -> some View {
        switch family {
        case .systemSmall:
            VStack {
                Text("small")
                Text(entry.date, style: .time)
            }
        case .systemMedium:
            VStack {
                Text("medium")
                Text(entry.date, style: .time)
            }
        case .systemLarge:
            VStack {
                Text("large")
                Text(entry.date, style: .time)
            }
        default:
            EmptyView()
        }
    }
}
이렇게 크기에 따라서 만들어 줄 수 있죠
한앱에 여러개의 위젯을 만들고싶다면
@main
struct NSWidgetBundle: WidgetBundle {
    @WidgetBundleBuilder
    var body: some Widget {
        NSWidget()
        NSWidget()
    }
}
main을 새로만들어준 NSWidgetBundle로 변경하고 WidgetBundle을 구현해주면돼요
이렇게 코드를 작성한경우에는
NSWidget에는 현재 작은사이즈, 큰사이즈가 있으므로
2세트인 4개의 위젯이 보이겟네요
'iyOmSd > Title: SwiftUI' 카테고리의 다른 글
| [SwiftUI] SwiftUI Stanford 정리 (2) | 2022.01.26 |
|---|---|
| [SwiftUI] 네비게이션 바 숨기기 (0) | 2021.12.18 |
| [SwiftUI] 뷰 상태변경 @State @Binding @ObservedObject @StateObject (1) | 2021.04.11 |
| [SwiftUI] HStack, VStack, ZStack 기본 레이아웃 (0) | 2021.03.15 |
| [SwiftUI] Published, ObservableObject (7) | 2021.01.29 |